Audiofly AF140 – Mini-Review

I’m sitting in bed today feeling decidedly lousy, but with the quandary of also having a pair of Audiofly’s new AF140 IEMs in my temporary possession for a review before I pass them on to another Head-Fi’er so I hope this mini-review can do justice to what I find to be a really enjoyable set of IEMs. Please don’t make the mistake of assuming that the brevity of my review or quantity / quality of photos reflects the quality or performance of the product in any way.

Before I get started, I’d like to thank the team at Audiofly and Billy from Noisy Motel for making this tour possible. I know that the AF140s have received some criticism so far which is always a risk during a tour, but I honestly believe that the criticism is misplaced and a result of personal tastes (which we are all completely entitled to) as opposed to a product design flaw. I believe the AF140s hits its brief as perfectly as the previously reviewed AF180s – it’s just that the brief in question isn’t for everyone and that’s fine. Read on to see if it might be for you…

To read this review please head over to the new Passion for Sound site. It’s sexier and there’s lots of great new content on the way.


Fiio X5 Portable Hi-Res Music Player

Fiio’s latest contribution to the world of sound and music came in the form of the X5 portable music player. Following on from the recent release of their limited edition portable amplifier, the E12DIY, the X5 is another statement from Fiio that they want to play at the high end of sound quality, even if the pricing is still only at the mid level (and for that we are thankful!)

Overview

  • Size:  67.6 x 114 x 15.6 mm
  • Weight:  195 g
  • Storage:  2 x micro SD (TF) card slots – max capacity 256Gb at time of launch
  • Line-out:  1.5 Vrms
  • Output impedance:  <0.26 ohms
  • Recommended headphone impedance:  16 – 300 ohms
  • Max output current:  >150 mA
  • Max output voltage:  8 V (peak-to-peak)
  • Battery life:  > 10 hours
  • Sample rates:  up to 192 kHz / 24 bit

There are plenty more specs available on the Fiio website (fiio.com.cn), but to me these are the key elements that show the general versatility of the X5. There are some further outstanding numbers such as crosstalk and signal-to-noise ratio, but there are different figures for the amped headphone out and the unamped line-out so I’ll let you look these up yourself to as not to overload everyone with numbers.

The X5 retails for around $400 and offers the same compatibility as other much more expensive players. However the question is whether it offers the same performance? I bought the X5 to replace my far more expensive RWAK100 so outstanding performance was a must and I haven’t been disappointed… for the most part.

To read the rest of the review, please head over to the new Passion for Sound site. It’s sexier and there’s plenty of great new content coming soon, but only on the new site. Hope to see you there!


iRiver AK100

I’ve called this review “iRiver AK100”, but it probably should be called the iRiver Astell & Kern Red Wine Audio RWAK100. I’l explain…

iRiver AK100 boxThe AK100 is originally designed by Korean electronics company, iRiver, in collaboration with Astell & Kern who seem to have appeared as experts in the hi-resolution / mastering quality sound space. Their site, www.astellnkern.com doesn’t really explain where their expertise comes from, but there’s no doubting that their influence has been positive on the sound quality from the AK100.

So where does the Red Wine Audio reference come from and the “RW” part of the model number (RWAK100)?

For some unknown reason, the designers of the AK100 decided to create a player with a 22ohm output impedance. Don’t worry if you don’t know what that means; I’ll explain. Almost anyway you look at it, a device used to drive portable headphones and earphones needs to have an output impedance as close to zero as possible. Most of the best devices have output impedance <2 ohms so 22 is way out of the ball park. What it means is that the AK100 can sound completely different from one earphone to the next, particularly with high-end, multi-balanced armature earphones like custom IEMs (e.g. Unique Melody Miracles). As a portable player, there is no good reason to create a device that completely changes (not for the better) the sound of almost every earphone or portable headphone on the market.

So along came Red Wine Audio…

Red Wine Audio is an American company renowned for their audiophile devices and the all famous iMod modification to the Apple iPod. When Vinnie from RWA got a hold of the AK100, he identified a way to bypass the 22 ohm resistors and create an AK100 with <1 ohm output impedance. And so the RWAK100 was born.

There are other modifications available from different companies. All do the same thing essentially, but my experiences are with the RWA variant and my experiences with both the product and with Vinnie have been stellar!

For the rest of this review, I’ll refer to the AK100 unless specifically referring to the RWAK100. The only difference is the output impedance and this only effects the sound quality with low-impedance ‘phones.

Design & Size

iRiver AK100 unpackedThe AK100 is a quality product. From the moment you open the box you know you’re using a prestige device. The whole case is a combination of aluminium and glass and it feels very well-built. Little touches really show how special iRiver / A&K wanted the experience to be. For example, below the player in the box is a little booklet with a micro SD card containing a selection of hi-resolution (mastering quality sound) tracks. The booklet provides information about each of these tracks. It’s a lovely touch to help you enjoy the AK100 at its full potential straight out of the box.

Another nice touch is the screen protectors. When you first open the box, the AK100 has removable protectors on the front and back glass panels. When you peel these off, you find semi-permanent protectors already fitted to the glass surfaces to protect from scratching (the same as screen protectors on a mobile phone). It’s another really nice touch. iRiver also provides spare screen protectors, but you’ll only need them if the pre-fitted ones get really scratched.

In terms of size, the AK100 is deceptively small. I had no idea just how small it was until I had it in my hands. AK100 iPod Video & Nano
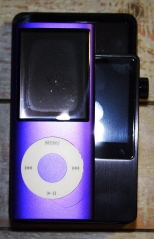
Here are 2 pictures with an 80Gb iPod Video (5.5G) and iPod Nano to show you exactly how compact it is (apologies for the image quality).

As you can see, the AK100 is shorter than both players. It’s the same width as the iPod Video (same as current model iPod Classic) with the exception of the volume knob on the left which protrudes just a tiny amount. The AK100 is a little lighter than full size iPods, but heavier than small iPods like the Nano.

AK100 Ipod Video Nano sideThe second image shows the thickness of the 3 devices. Clearly the Nano is much thinner, but also has less capacity and nowhere near the sound quality of the AK100 (or larger iPods). Without measuring them, I think the Ak100 may be a hair thicker than the iPod Video which also means it’s about twice the thickness of the current iPod Classic.

Capacity & Storage

Micro USB socket, MicroSD ports, Red Wine Audio badge

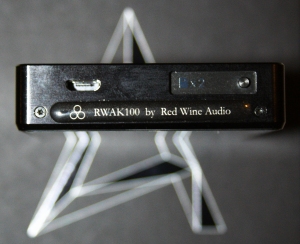
Micro USB socket, Micro SD ports, Red Wine Audio badge

The AK100 contains built-in 32Gb flash memory for onboard music and system files, but also allows the addition of 2 micro SD cards via a slot on the base of the device. The official specifications say that the AK100 can support up to 32Gb micro SD cards, but larger cards do work if formatted to FAT32 (larger cards come pre-formatted using the exFAT system).

Memory cards are housed under the slider shown in the image to the left. They’re a little fiddly to get in and out, but it keeps the device clean and tidy with no protruding bumps (other than the volume knob) or open holes into the circuitry.

Interface & Usability

The user interface of the AK100 has taken some flack for not being as smooth and intuitive as Apple devices, but recent firmware updates (v1.33 and v2.01) have made strides in this area. The following information is based on the current firmware (v2.01)

Starting screen
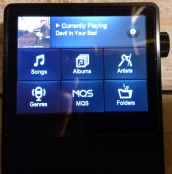
Most navigation is conducted via the touch screen which, although a little small, is responsive and simple. Navigation begins with the home screen seen to the right. It shows the current track with artwork and some simple thumbnails to access your library in a number of ways including MQS which takes you instantly to a listing of all hi-res tracks on the device (e.g. 96kHz / 24-bit and 192kHz / 24-bit recordings). There’s also a cog button in the top right corner to access device settings.

All-in-all the interface with the new firmware is simple and intuitive.

AK100 now playing
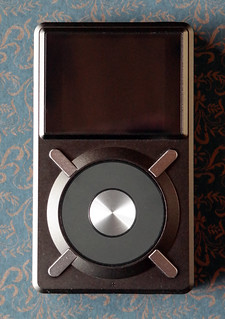
When you’re playing a track, there are a few options for the display. You can have just the art showing or the art as a backdrop behind track information. This is changed just by touching the screen. You can also change how artwork is displayed with choices between fitting to the screen or filling the screen. My photos show my preferred setting of filling the screen.

Other options that are easily accessed from the “Now Playing” screen are:

  • 5-band equaliser
  • Gapless playback
  • Boost
  • Detailed track information
  • Shuffle or continuous play

AK100 hardware buttonsThere are hardware control buttons on the left side of the player (as you look at the screen) with buttons for skipping forwards and backwards as well as playing and pausing. Holding down the forward and back buttons acts triggers a seek function (i.e. fast-forward / rewind).

One final point about usability is the volume knob. It is designed to allow some movement. Some people don’t like this, but for me it feels fine and I like the implementation of the volume control overall. The knob has a notched feel as you turn it so you can clearly feel the increments. The increments are also very small so you can’t accidentally deafen yourself.

If you do want to raise or lower the volume quickly, you can use the touch screen for rapid, large changes. After turning the volume knob, a graphic appears on-screen which allows you to touch and drag an orange volume bar. It’s easy and responsive.

If you’re worried about bumping the volume knob in your pocket you can also select to lock the volume control when the screen is off so, to me, iRiver have covered volume control really nicely and in a unique way. It took a little while to get used to, but I really like the results.

Battery Life

Thank you to Head-Fi user, edmonem, for asking about battery life as I originally forgot to include this information!

The battery in the AK100 normally lasts in excess of 10 hours (and quite comfortably in excess). I’ve been a little conservative with this number because the battery life will vary based on your individual usage habits. Regular skipping of tracks, continuous high volume, keeping the screen on, etc. will all drain the battery faster. With normal listening at around 55-60% volume continuously nets me long 10+ hour playback times.

Just as some of the usage above will drain the battery, using an external amplifier can extend the battery life significantly by presenting a much easier load to the AK100. You may also find variation depending on the ratio of hi-res tracks to 44.1kHz /16-bit tracks (hi-res tracks use more battery).

Format Compatibility

The AK100 will play almost any file you can throw at it. Common supported formats include FLAC, WAV, MP3, WMA, OGG, APE, AIFF, ALAC, and AAC. Some users have been discussing the desire for DSD, but this is currently not supported. iRiver have mentioned the possibility of support in future firmware updates although it would convert the DSD for playback as opposed to direct playback without manipulation.

Connectivity

AK100 in / out portsThe AK100 can be connected directly to headphones via a 3.5mm jack (top of image), but this also doubles as an optical output. It also has an optical input to work as a DAC for other devices with optical out. There is talk that it will operate as a USB DAC in future (i.e. for use as an external soundcard / DAC with computers), but no timetable has been confirmed for this feature.

I’ve successfully used the AK100 with all outputs / inputs and they all work brilliantly. You can control the volume when using the headphone output (including when listening to the optical input), but the output is fixed level when using the optical out.

Sound Quality

Simply put, the AK100 is the best portable source I’ve heard so far and is actually up there with the best source units I’ve heard at all. It easily keeps pace with any of the dedicated sub-$1000 deskptop DAC / amp combinations I’ve heard and yet it’s in such a tiny package!

The sound from the AK100 is wonderfully smooth, but immensely detailed. Unfortunately, it’s output impedance issue (discussed earlier) means that its sound can vary dramatically when paired with the low impedance ‘phones. Using an amplifier completely negates this issue and can further enhance the quality of the sound (if it’s a good amp).

Because I wanted the freedom to use the AK100 with and without amping, I chose to get the Red Wine Audio mod. The sound signature and presentation hasn’t changed significantly, but it stays consistent no matter what I connect to it – low impedance IEMs right through to high impedance headphones.

The most impressive aspect to the AK100’s sound is its cohesive and organic presentation. There is amazing detail with plenty of separation between different sounds, but everything also still sounds like it fits together. I was recently able to test the AK100 alongside the HDP-R10 (Japanese version of iBasso DX100) and found that the HDP-R10 seemed to separate sounds more, but to the point that I actually found the whole presentation began to sound like a collection of parts, not a single organic whole. There’s no denying the resolution and clarity of the HDP-R10, but I personally preferred the natural presentation of the AK100.

Overall, the sound style of the AK100 is smooth and a touch warm, but not lacking in detail or clarity. It sounds great playing regular 16-bit / 44.1kHz tracks and then really sings with hi-res, 24-bit tracks at higher sampling rates. It’s one of those devices that can really help you rediscover your music and hear it in a whole new way.

The Drawbacks

There are a couple of things I haven’t mentioned yet, but think are important to note.

The AK100 currently doesn’t support playlists created by common media management software (namely “m3u” playlists) or CUE files which tell a player how to split a single FLAC file into its individual tracks. iRiver report that these features are highly requested and on the way, but at the time of writing they were not available.

Another minor gripe which occasionally becomes very frustrating is the scanning feature. Anytime you load new tracks onto the AK100 or insert a memory card, the AK100 needs to scan the files to create a database for navigation. This can take a long time, especially when you’ve just unplugged your AK100 from the computer and want to walk out the door ready to listen to music.

You can switch scanning to auto or manual so that it doesn’t delay your listening, but if you don’t scan, you can only access your music by browsing folders, not by artist, genre, track names, etc. Some people are fine with this, but I like to access via the database, not by file viewer.

iRiver keep reporting changes in the firmware to help speed up the process, but it still isn’t at a level that’s easily bearable. Hopefully they’ll find a fix in the future, but in the meantime I’ve learned to think ahead and allow scanning time before trying to use my AK100.

These drawbacks are minor concerns given the amazing sound quality and overall performance of the AK100. I wanted to share the full picture, but don’t be turned off. There’s no such thing as the perfect player (yet) that combines top quality sound with usability, playlist features, seamless interface, etc. In my opinion, the RWAK100 is as close as it gets so far and there’s the potential that all the drawbacks mentioned above will be recitified via firmware updates in the coming months.

Summary

iRiver AK100 unpackedIf you have around $600 to spend on a portable music player and you already have an amp, the AK100 is a great option! If you can spend a bit more, or don’t have an amp, I highly recommend the Red Wine Audio version, RWAK100.

Other players on the market offer different price points and features, but nothing quite matches the AK100’s combination of size, performance and price – it’s a brilliant player and has quickly become one of my most treasured audio devices!

A Simple Guide to Equalisers

Equalisers are an interesting topic. Many people will steer clear of them while others love the option to customise every song, album, pair of speakers or pair of headphones to their own personal tastes. To help you make an informed decision about whether to use an equaliser and how to use an equaliser, here are some key facts.

Impact on Sound Quality

Firstly, electronic equalisers like those in iTunes and in your iPod will generally reduce the quality of the sound. Depending on the headphones or speakers you’re using and depending on how loud you listen to the music, you may not notice the difference so don’t necessarily write off the use of an equaliser based on this fact – you need to decide based on the merits for and against. For some people, a slight reduction in quality might be worth the improvement to the overall tone of the sound. There are also some ways to use an equaliser that are less likely to impact on the sound quality – I’ll discuss these later.

The main reason that equalisers decrease sound quality is the power required to boost audio output by even a small amount. A 3dB increase to the sound (or selected frequency) actually takes double the power! This generally means that you’re pushing the limits of the in-built amplifier of your computer or portable player which leads to a thing called clipping. Without going into detail, clipping refers to the top of the sound wave being cut off because the amplifier doesn’t have the power to create it. It’s a little bit like accelerating in your car until the engine hits the redline and the power disappears, resulting in a rapid loss of performance and potential damage to the equipment.

To minimise the impact on sound quality, you can employ a technique that’s often referred to as subtractive equalising. All this means is that you drag the sliders down rather than push the sliders up – I’ll explain.

iTunes EQ

See the image on the right? That’s the standard iTunes equaliser panel and it’s typical of most EQ setups where the sliders are sitting in the middle at “0dB” meaning that there is no change to the standard amplification of each frequency. If you move a slider up by 1 “notch”, you’re increasing that frequency by 3dB and asking the amplifier to provide double the power at that frequency. The result is generally distortion around that frequency. It’s much easier to set an EQ by increasing the frequencies you want more of, but you’ve probably gathered that this will hurt the sound quality.

EQ settings from -12dB

Here’s the alternative: rather than increasing the frequencies you want more of, decrease all the rest! The simplest way to do this is to start by dragging all of your EQ sliders down to the bottom (-12dB). At this time you might need to turn up the master volume of your device to get the sound back to an enjoyable level, but this is fine because the master volume doesn’t decrease quality. Now you’re ready to adjust your EQ. Start using the sliders to increase the frequencies you need up to a maximum of 0dB. Avoid going above 0dB for any frequency because it will instantly decrease sound quality.

All sliders increased (Maximum 0dB)

Once you’ve got the sound the way you want it, try to increase the sliders so that the shape of your EQ stays the same, but so that the highest slider is right on 0dB (see the last EQ image).

Note: one slight issue you might face with this technique is a lack of maximum volume. If your headphones or speakers are hard to drive and you need nearly 100% volume to get the sound you want, this technique may lead to insufficient sound levels. If that’s the case, you might want to look into extra amplification or different headphones or speakers.

The final dilemma you might be facing is which slider to increase to get the sound you want. The next section should help…

What Does Each Frequency Change?

So you’ve opened your EQ settings and you’re ready to perfect the sound signature for your ears only, but where to start? Which slider to slide?

In the end, it’s all experimentation for the fine details, but here are some clues about where to start. (I’m using the iTunes frequency points as a reference to make it easy for comparison.) I’d recommend using the following information by listening to a range of tracks that you’re familiar with. See if you can identify what’s “missing” from the sound based on the descriptions below and then add a little at a time to see if it helps.

32 Hz – This is subwoofer territory – the bottom end of the bass range. As much as we all love it, sometimes it’s better to drop it out or leave it flat if your speakers can’t this depth of bass. Bass is difficult for amplifiers to sustain so you can give your amp some breathing room by dropping this away if you can’t hear it anyway.

64 Hz – This is the part of the bass that we feel as much as hear. This is a great frequency to boost if you want to feel a bit more bass vibration. Increasing this will give your music more kick at the bottom end.

125 Hz – This is musical bass. If you’re listening to melodic bass guitar riffs, this is where the action is. It’s a good frequency to increase to emphasise the musicality and accuracy in bass rather than the rumble or the mass of the bass.

250 Hz – Although there’s no simple definition of bass vs midrange vs treble, I think of 250 Hz as the crossover point between bass and midrange. At 250 Hz we’re starting to increase the bottom end of male vocals and the lower range of instruments like guitars. Beware though – increasing the midrange sliders can very quickly make your music sound muffled or “canned” (like it’s being played through a tin can”. I would rarely increase this frequency, but might consider reducing it slightly to open the sound up a bit and make it more “airy” and spacious.

500 Hz – Like 250 Hz, 500 Hz is the realm of muffled sound. It covers male vocals and the middle of instrumentation. It’s impact on most music is a sense of muffling – like you’ve covered everything in cotton wool.

1 kHz – This is the realm of vocals, instruments like guitars and saxophones and the snare drum. It can bring brightness to the midrange, but can also start making the sound a bit tinny.

2 kHz – Around 1 – 2 kHz is where we start venturing into the realm of treble. We’re still in the world of vocals and instruments here, but we’re getting towards the top-end so it’ll cause vocals to sound a bit more nasal and increase the perception of the texture of voices – things like breathiness and raspiness. It also can make sound very tinny.

4 kHz – This is the frequency that’s most prominent in sounds like “sh” and “ssssss”. It’s also a part of sounds like cymbal hits and the upper end of a snare drum’s sound. Adding emphasis to the 4 kHz range can very quickly make music harsh on the ears and unpleasant to listen to. That said, using it carefully can bring clarity and brightness to vocals and percussion.

8 kHz – This frequency is pure treble. This is what is most prominent if you turn the “treble” dial up. It influences the very upper end of sounds like “sh” and “ssss” and it has a major impact on percussion such as snares and cymbals. It is great to use to add brightness to the sound, but can also get uncomfortable if overused.

16 kHz – Given that 20 kHz is considered the upper end of human hearing, this is obviously the pointy end of the treble band. It mostly affects cymbals and similar sounds, but it also picks up the brightness and detail in the texture of certain instruments. For example, increasing the 16 kHz slider (and/or the 8 kHz slider to a degree) will enhance the sound of the plectrum hitting the strings of a strummed guitar. Like the 8 kHz slider, the 16 kHz slider is a great way to add brightness and tends to be more gentle on our ears. That’s not to say it’s not just as loud, but generally it doesn’t sound as harsh. Incidentally, 16 kHz is also at the end of the hearing range where we lose our hearing first so we might appreciate a slight boost to this area as we get older and lose our hearing.

I hope this has helped you to get more from your music collection, favourite speakers or portable player!

Understanding MP3s (and other compressed music) – Part 3… Finale

Welcome to the final installment of my 3 part series of posts about the pros and cons of compressed audio. If you haven’t read from the beginning, it’d be a good idea. Here’s a link: Understanding MP3s (and other compressed music) – Part 1

By the end of Part 2 you hopefully have an understanding of the process of compression (i.e. removing sounds that we theoretically won’t hear) and also the impact that this removal has on the overall “picture” created by the sound. For this final part of the article, you need to keep this concept of a musical “picture” in mind because this final concept is all about the hidden magic within the picture, not the individual, identifiable details.

Harmonics

You might have heard of harmonics before. If you’ve played certain musical instruments (particularly stringed instruments), you might have even deliberately created pure harmonics. If you haven’t heard of harmonics, don’t worry – here’s a short explanation.

Anytime you play an instrument that uses a string or air to create sound (i.e. just about any instrument other than electronic synthesizers), you are creating harmonics. Harmonics are the sympathetic vibrations that occur along with the note that you’re creating. Have you ever run your finger around the rim of a glass to create a musical note? That’s the same concept. Your finger running on the edge of the glass creates vibrations. If you get the speed of your finger movements correct, the vibrations you create, match the natural vibration frequency of the glass. As a result, the whole glass vibrates together and forms a beautiful clear note. Different glasses will vibrate at different speeds of movement  and will create different notes as a result. This is the concept of harmonics.

If you were to walk up to a piano and strike the key known as “Middle C”, you would hear a note – just one single note, but that note will have a quality very different to the same note on another piano or on a violin. The reason for this is the creation of resonance and harmonics. To explain this, I’m going to talk about the note called “A” which is a few notes above “Middle C”. I’m using the “A” because it makes the maths easier.

If you now strike the “A” you’ll hear a single note once again. This time, the note will sound higher than the previous “C”. What’s actually happening though is that your ear is receiving vibrations in the ear and these vibrations are moving 440 times every second (440 Hz). However, there are also other vibrations going on and the majority of these vibrations are directly related to the 440 Hz we began with. As the “A” string inside the piano vibrates, it creates waves of vibration. The loudest of these move 440 times per second, but it also creates other waves moving 880 times, 1760 times, 3520 times per second, etc.

Every note created by an acoustic instrument naturally creates these harmonics which go up in doubling increments (i.e. like 1, 2, 4, 8, 16, 32, etc.) Old synthesizers sounded particularly fake because they didn’t recreate these harmonics and the output sounded flat and lifeless. Newer synthesizers create harmonics artificially and have come closer to the sound of the real thing, but there’s still a degree of difference created by the subtleties that can be created by acoustic instruments. A slight difference in strike pressure on a piano, plucking/strumming strength on a guitar or force of air through a trumpet can create a significantly different tone as a result of the different range of vibrations it creates. All of these subtleties are the “magic” that make music so special and exciting.

A quick note: this blog is not an anti electronic music. Electronic instruments (i.e. synthesizers, drum machines, etc.) can create amazing music which is impossible with traditional acoustic instruments. The discussion of acoustic versus electronic instruments is designed purely to illustrate the importance of keeping harmonics where they were originally intended/recorded.

Harmonics, Subtleties & Compression

In reading the section above, you might have wondered why you’ve never heard these harmonics. You might even choose to put on your favourite CD and try to listen for them. You can actually hear these harmonics if you listen carefully, but the key thing to recognise here is that we aren’t consciously aware of them in normal circumstances. The harmonics and subtleties happen “behind the scenes” of the music and are rarely noticed by the casual listener or anyone who is not actively listening for harmonics.

If you now think back to my previous discussion of compression and the removal of sounds that we theoretically don’t hear, you might see the connection. The first things be “compressed” (i.e. removed) are the harmonics and subtle, quiet sounds that create the finest details and tonal qualities of the music. To the casual ear, nothing seems to be missing, but play the same song compressed and uncompressed through good speakers and you might notice a difference that you can’t quite put your finger on. Here’s another visual example.

The following picture is a hi-resolution (1900 x 1200) desktop wallpaper image provided with Microsoft Windows 7. I’ve used it because it has a certain magic about it in terms of its depth and detail.

The next version of that image is at a lower resolution of 800 x 500 pixels (a bit like a lower bit-rate of compression).

Notice there’s a certain level of the “magic” missing from the second image? It’s hard to put a finger on exactly what’s missing, but the image isn’t as instantly captivating and engaging to the eye. It almost looks flatter somehow – less bright and alive.

Here’s one last version at 600 x 375 pixels, making it even lower resolution and stealing more of the “magic”.

Are you seeing a difference? Don’t worry if you’re not. Go back now and take a close look at the textures of the character’s face and the stitching on his costume. As the resolution drops, so does the detail. See it? That’s exactly what’s happening to your music.

Compressed Music in Real Life

Although it’s probably clear by now that my preference is always for uncompressed music (known as lossless music because no detail/information is lost), it’s not always practical. Understanding compression allows you to choose what suits your needs best. Here are some factors to consider when choosing your level of compression (or choosing no compression):

  • How much space do you have for your music on your computer, device hard drive, iPod, etc? You’ll need to use compression if your space is limited and you want to store a large number of tracks. Here you need to weigh up quality, quantity and space. You can consider increasing storage space, decreasing the quantity of tracks or increasing the compression (and therefore decreasing the quality of the music).
  • Where and how do you listen to your music? If you listen in noisy environments, at very low volume (i.e. background music only) or use low quality speakers/headphones then you might as well use slightly higher compression to maximise the quantity of tracks. The noisy environment issue can be overcome with in-ear earphones and noise cancelling earphones, but the other situations generally mean you can afford to sacrifice quality for quantity.
  • How much does it matter to you? After all, you’re the one doing the listening so if you’re happy with music at 128 kbps that’s all that matters. There’s no such thing as a right or wrong level of compression – it’s entirely up to you.

The best way to decide is actually quite simple. Take a well-recorded track (or two) that you really like and use your music player (iTunes, Windows Media Player, etc.) to compress it in different ways. Next, listen to the different versions on your favourite headphones and/or speakers and decide what you’re happy with. Way up the differences you noticed between the different levels of compression and think about how much space you have to store music and then make a decision.

Summary

Compression is a fantastic tool for portable audio and convenience, but if you have no significant space restrictions, I highly recommend sticking with lossless audio (either Apple Lossless Audio Codec – ALAC, Free Lossless Audio Codec – FLAC or Windows Media Audio 9.2 Lossless). You never know when you might upgrade your speakers or headphones and even if you can’t hear a difference now, you might be amazed at the benefits you get with that next pair of speakers or the next set of headphones! Don’t give up the magic of the music unless you absolutely have too!

Understanding MP3s (and other compressed music) – Part 2

Welcome to Part 2 of my series of posts about the pros and cons of compressed audio. If you haven’t read Part 1, it’d be a good idea. Here’s a link: Understanding MP3s (and other compressed music) – Part 1

Wielding the Eraser

I explained in Part 1 that compression means pulling out sounds that we won’t actually hear, but think about this… The music is like a painting that we “see” with our ears. Compressing music is the equivalent to taking an eraser to the Mona Lisa. It’s like saying, “No-one will notice this brush stroke of stray colour or this tiny bit of shading.” Perhaps that’s true and, to a degree, no-one would notice, but at some point the whole painting’s just going to lose something. It’ll lose a little bit of soul. Sure, you might not pick exactly which parts are missing, but you’ll know something’s not right. Here’s an example:

Notice how the sky in the second image looks unnatural and full of lines? That’s because the process of compressing has removed some of the subtle shades of blue and replaced them with wider bands of other shades. For example, let’s number the different shades 1.1, 1.2, 1.3 and 1.4. During the compression process we would replace shade 1.2 with a second band of 1.1 and replace 1.4 with a second band of 1.3. Now that blue sky would be made of bands of shades 1.1, 1.1, 1.3, 1.3. You can see the evidence of this above in the second image.

So looking at the example photos, it’s clear that they’re both the same photo, but if you had to choose one to print and frame, I’m guessing you’d choose the first one because it’s closer to real life and therefore more pleasing to the eye. The same goes for music.

Think of music as a complex bunch of vibrations making a particular range of patterns. Any little detail you remove from those vibrations will permanently alter the overall “picture”. You’ll still recognise the sound or the song, but it won’t actually sound identical to the original.

Let’s talk about the ear again. Remember my description of how we hear? The ear perceives music like the eyes perceive a painting. You take it all in at once, you don’t pick out a particular colour here and a particular texture there, you just see it as a picture. When we compress sound we permanently alter the “picture” as if we had taken to it with an eraser. To our ears, the result is no different to the photo above on the right. It might not be as dramatic (depending on the level of compression), but it’s essentially the same. You don’t notice a loss of individual sounds, you notice a loss of overall quality and realism.

Here’s one final visual version to show you what I mean. The following charts are spectrograms that show sound as colour. The darker the colour, the louder the sound and the higher up the colour appears, the higher pitch the sound is. A bass guitar shows up down the bottom while a violin shows up further towards the top. There are 2 lines in each chart – these are the left and right stereo channels.

Spectogram - lossless

"This is How a Heart Breaks" - no compression

"This is How a Heart Breaks" - moderate compression

"This is How a Heart Breaks" - mid-high compression (128 kbps)

Notice the density of the yellow and orange colours reduces as you get more compression? The more blue you see, the less of the musical “picture” is still intact. You might also notice that there is more variety and clarity in the colours on the top chart and the colours all get more “blurry” as you move down the charts. That’s the effect of averaging things out. If you look at the first spectrogram and then the second, you might notice that the second one looks like a slightly out-of-focus copy of the first one.

By the time we get to 128 kbps, nearly every high frequency sound is removed. That’s because we lose those hearing at these frequencies first and are less likely to notice the missing sound… or at least that’s the theory. The key thing to notice here is that the musical pictures are different. This is the most visual representation of sound that I can provide and it illustrates exactly how the musical “picture” is gradually erased by compression.

In the Final Installment

Now that you know how we perceive sound and how compression works, you’re all ready to read about why compressed music loses its “magic”. In Part 3, I’ll explain a bit harmonics and their role in creating the soul of the music. I’ll also sum up what this all means when it comes to choosing the level of compression that’s right for you.

As always, I hope you’re enjoying this information and I welcome any feedback or questions you might have.

Ready for Part 3?